Showing posts with label lesson ideas. Show all posts

Thursday, April 25, 2013

Cultural "Artifakes" and Artifacts

Cultural “Artifake”
In Social Studies, my 3rd graders are learning about primary and secondary sources and cultures of the past and present. To begin our unit we learned about artifacts or any object made by a human being, typically an item of cultural or historical interest. Tools, jewelry, pottery, clothing, toys…all of these are example of artifacts.

To make this lesson meaningful for the students we asked them to share a cultural “artifake” or a fake artifact from their culture. A cultural artifact is anything created by humans that gives information about a culture. Some students created their “artifake” while others used a objects found in their homes. 
                  
We asked the parents to talk to their child about their “artifake” and how it represents their culture. In the classroom we placed all the items in our cultural museum, the student's labeled their "artifake" and included details about where the "artifake" originated.


After learning more about different cultures around the world, the student's interviewed each other about their personal cultures. At this time, they were able to share their "artifakes" with each other. The students were able to make new connections to their culture and the culture of their peers through this activity and the passages in the text.

Saturday, April 20, 2013

Text Features, Text Features...


Text features are parts of text that draw your attention to important information. Some examples of text features include Headings, Photographs, Captions, Print Styles, Illustrations, Charts, and Diagrams. Text features help readers to understand the important parts of the text. They also can help readers to make predictions and set a purpose for reading.

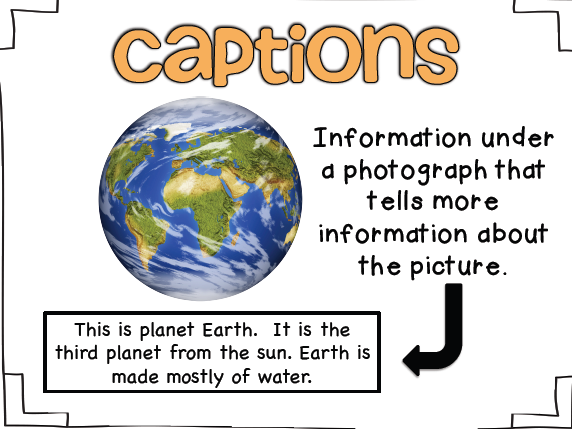
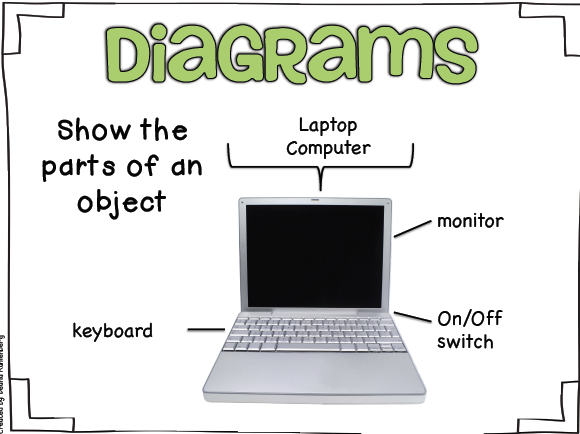
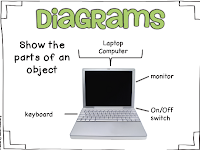
To kick off our unit on text features we introduced different types of text features using posters like the "Captions" and "Diagrams" examples above. After introducing each text feature, the students hunted for the text feature in their Science and Social Studies textbooks. We quickly learned how to identify different types of text features.

We then created a Text Feature Wall, the students worked in groups to find the very best examples of each text feature from various non-fiction magazines. We discussed each text feature and how it was used in the text and then we organized the text features on our Text Feature Wall.


As we read about the Neighbors of the United States in Social Studies, we continued to identify and label the text features in each chapter. We discussed why the authors decided to use the text feature and what was its purpose. For example, a map may help us to learn where things are located or it may help us to understand specific information about a region.


After the students were familiar with text features and their purposes, we used textmapping to help us make predictions and set a purpose for reading. Before reading the next chapter in our Social Studies text, we made copies of the chapter and pasted the pages in order on a long scroll. Then the students worked in groups to identify each text feature using a textmapping key. 


After identifying each text features, the groups labeled their purpose. It was challenging for the students, but we encouraged them to be specific (ie. not to write the purpose of a map, but to write the purpose of the specific map in that chapter).


Once the scrolls were complete the students could "read" the text features to learn about the content in the chapter. The students were impressed with how much you can learn just from "reading" the text features! We were also able to make a lot of predictions about the chapter before we even read it. 

Text features have become part of our daily discussions in Reading, Science, and Social Studies. I love it when the students refer to a chart, sidebar, or any other feature to provide evidence to their conclusions!

Saturday, March 23, 2013

Fishing for Fractions

My 3rd graders had some difficulty with comparing and ordering fractions. To help them review I created a Dr. Seuss inspired fraction review, Fishing for Fractions.


We celebrated Dr. Seuss week with some fraction fun! In this fraction flip book my students worked in groups of four to represent, compare, and order fractions using various strategies and models. 


  Each student in the group had a different fraction on their cover pages, once their booklet was completed they put their fish bowl fraction flip books in order from least to greatest. 


Once the class finished their fraction fish bowls we had to share with the rest of the school. We decorated the halls with our fishy fractions. My supervising teacher made those amazing red fish and blue fish to add to the fun!


This packet is aligned to the following Common Core Math Standards: NF.1.1: NF.1.2: NF.1.3

This packet is aligned to the following NCTM 3rd Grade Standards:
Recognize equivalent representations for the same number and generate them by decomposing and composing numbers.
Develop understanding of fractions as parts of unit wholes, as parts of a lines, and as divisions of whole numbers.
Use models, benchmarks, and equivalent forms to judge the size of fractions.
Recognize and generate equivalent forms of commonly used fractions.

Develop and use strategies to estimate computations involving fractions in situations relevant to students experience. 

Friday, March 1, 2013

How many raisins are in a mini-box of raisins?


To expose our third grade students to more hands-on math activities, the fantastic 3rd grade teachers and I incorporated Mathtastic Fridays into our schedule. Every Friday we use our math skills to solve real world problems. This Friday we became Great Graphers as we asked ourselves, exactly how many raisins can you find in a mini-box of raisins. Below is a quick summary of our activity.  

First, we asked ourselves – How many raisins are in a mini- box of raisins? 
Each student received two unopened boxes of raisins. We made some interesting observations of our mini-boxes such as, both boxes are exactly the same size and same shape. We revisited our question and the students shared their predictions with their partners.

Then, we collected our data. 
Each student carefully counted their raisins (I had to remind them not to eat their data). They recorded their totals on their data sheet. 

Next, we organized our data. The class decided a line plot would help us to organize the class' information. We found the highest number of raisins in a box and the lowest. The students used this information to construct the scale for the line plot. 

Then, we began plotting our data. Each student added one dot sticker to represent number of raisins in each box.

After everyone's mini-boxes were plotted, we analyzed our data. We asked ourselves:

  • What do you notice about the data in this graph?
  • Every mini-box was the same size, why do you think every box did not have the same amount? 
The students came up with wonderful observations! We also found the range, mode, and median. 


Finally, we interpreted the results to answer our original question-How many raisins are in a box of raisins? 
Using our data, we predicted how many raisins are likely to be in a new box  of mini-raisins. The kids were great graphing detectives as we tried to find an answer to our real-world question. Everyone loved graphing with raisins.

Thursday, February 28, 2013

A Unit on Figurative Language...


Recently, I used this Prezi and a variety of children's literature to explore different types of figurative language with my 3rd graders. After reviewing the definitions and examples of one type of figurative language in the Prezi, we examined how author's use this type of figurative language in context. Sometimes, we read the entire text, sometimes we read snippets of the text, and sometimes we read the text 2 or 3 times. Some of the books we used include:
Some Smug Slug by Pamela Duncan
Amelia Bedelia by Peggy Parish
The Little Red Hen by Paul Galdone
The Little Red Pen by Janet Stevens and Susan Stevens Crummel
Bedhead by Margie Palantini
Piggie Pie! by Margie Palantini
Cloudy Chance of Meatballs by Judi Barrett
“Ode to Pablo’s Tennis Shoes” by Gary Soto
Shel Silverstein's poems


Then students became writers themselves as they created their very own Figurative Language Flipbook. Each "flip" was designated for a different type of figurative language. The students had to include the definition of the type of figurative language, at least one original example, and a picture to support their example(s). When complete with each flip the students would assess themselves using a rubric. 

This was, by far, one of the more enjoyable lessons for both me and the students that I've taught this year. Between the Prezi, the music video, the books, and the student's Figurative Language Flipbook, the students were completely engaged. The student rubric helped the student's to take ownership and reflect on their work. The students continued to sing the figurative language song throughout the day. They loved to tell me when they heard someone use figurative language or when they spotted it in a story. In fact, they loved it so much that we had to come up with a silent hand signal. To this day, when we hear figurative language we'll quietly touch our nose and smile!

Thursday, January 31, 2013

Learning about Story Elements through Storytelling Pathways

Learning the basic elements of a story helps students develop their reading comprehension. It is also foundational knowledge necessary to become effective readers and writers. I have presented this lesson plan with kindergarten, first, and third grade students. Young or older, the students were engaged and enthusiastic about creating their pathways. Also, the repetition and visuals support all learners!

Friday, August 31, 2012

Prezi Webquest

Last semester I had the opportunity to create a 4th grade Social Studies unit plan about Florida explorers with a group of my peers. We created a Webquest using Prezi (one of my favorite presentation tools). To kick off the unit, we created a Prezi on Christopher Columbus, a familiar explorer for many 4th grade students. During this presentation, the teacher will also model important presentation skills that the students will be assessed on when they present at the end of the unit. After the Christopher Columbus presentation, the students will break up into groups and learn about a Florida explorer. Students will use teacher approved websites using diigo, graphic organizers, and various multimedia tools to create a presentation about their explorer. Throughout their learning journey the student groups will follow the step by step directions stated on the Prezi Webquest. The entire unit plan, including printables and other resources can be found here: http://ucfgr4flexplorerssp12t.wikispaces.com/ Although we tried to plan our activities across the curriculum, looking back it is apparent that we had too many activities for a 5 day unit plan. In the real classroom this unit would require 2-4 weeks. Overall, completing this unit plan was a great experience. I learned so much from this project and my peers. I cannot wait to put these ideas into action in a real classroom.

UPDATE: After completing our course, my peers and I had the opportunity to present our unit plan at our university. Below is the Prezi we created for the workshop.

Friday, August 17, 2012

Make a Cloud in a Cup Lesson Plan


A second grade science lesson inspired by The Schroeder Page and based on the National Science Education Standards (NSES), Next Generation Sunshine State Standards (NGSS), Common Core State Standards (CCSS) and Florida Educators Accomplished Practices (FEAPS).


Island Inequality Mat Lesson Plan-Modified for English Language Learners

Tuesday, June 26, 2012

FCRR: Florida Center for Reading Research


http://www.fcrr.org/ is another fantastic website for teachers. This site provides a lot of information on best practices used to teach and assess reading it. I've found the intervention strategies for struggling readers very helpful. However, my favorite resources is the student center activities page. Lots of printables for centers and all of the activities are aligned to the common core!

Tuesday, June 12, 2012

KB...Konnected

banner

Have you been to kb...konnected? It's one of my favorite teacher blogs! KB is constantly posting useful teacher resources. Many of educational websites she has shared have become my kid's favorite places to play online. She also posts tons of freebies and great printables. Check it out!

Read, Write, Think

ReadWriteThink

readwritethink.org is one of my favorite websites for teacher resources. There are tons of great lesson plans and activities for specific books or learning objectives. They also have online activities to engage students and fantastic printables to use in the classroom. 

I've found their Strategy Guides to be extremely helpful for a student teacher. The Strategy Guides provide information on great teaching techniques and key concepts that I can teach to help my future students become effective readers.


Tuesday, May 15, 2012

Setting personal goals in the classroom with Daruma dolls


Daruma Dolls
Students can learn about customs from another culture in this fun goal setting activity.


Daruma dolls are a Japanese good luck symbol. They stand for the spirit of courage and determination. The weighted bottoms and rounded shape forces this ancient cultural doll to right itself after being knocked over, teaching us to be dedicated and persistent and symbolizing our recoveries from misfortune. The Daruma dolls are often given to someone when they start something new. The dolls come with both eyes blank. After purchasing or receiving it as a gift, you paint one eye and make a wish or begin a new project. The second eye is painted when the wish comes true or the project is completed.

In my of my courses the professor invited each of us to set a personal goal for the class using a Daruma doll worksheet. We recorded our goals for the course on the back of our "doll" and colored in one eye. At the end of the course we revisited our goals and if we were successful in accomplishing them we colored in the other eye.

I thought this was a great activity for any age to set personal goals while learning about an interesting Japanese custom. Below is a Daruma doll worksheet.

Directions: What is your goal for this class? Think, decide, and record it on the back of your “doll”. Color in one eye.

Tuesday, April 17, 2012

Whoever You Are by Mem Fox: A Storytelling Prezi